How Do I Change My Online Portfolio Domain/Address?

It's easy to change your Crevado Online Portfolio Domain, firstly from Crevado Admin, click on Settings:

NOTE: When you rename your Crevado Portfolio address the old address will no longer work.

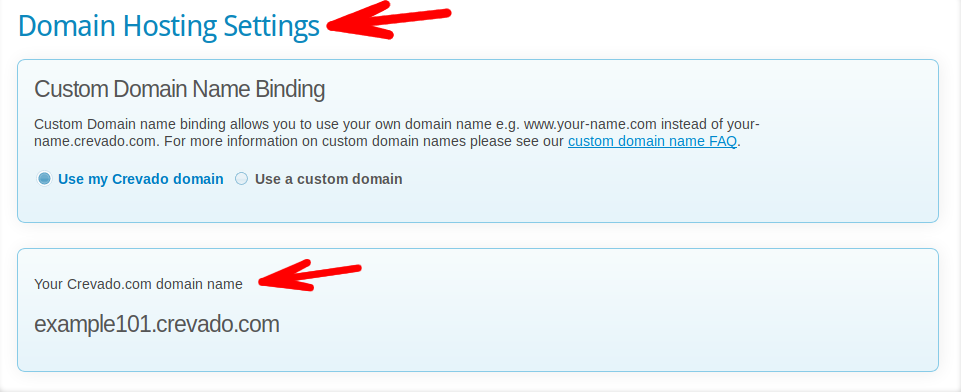
Scroll down to Domain Hosting Settings and click on the box entitled Your Crevado.com domain name and you will be able to edit the existing domain name:

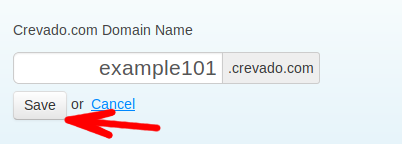
Enter your new Domain name and when finished click Save:

NOTE: If the Domain you want is already in use, you will receive a message informing you of this and you will have to choose an alternative - sorry!

That's it, you're all done!

How Do I Allow Image Downloads on My Crevado Online Portfolio?

By default, Crevado protects your images from being downloaded. In some cases however you may wish to allow visitors to easily download copies of your images, if that's the case then no problem!

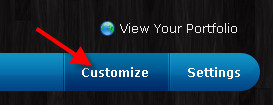
From Crevado Admin click on Customize:

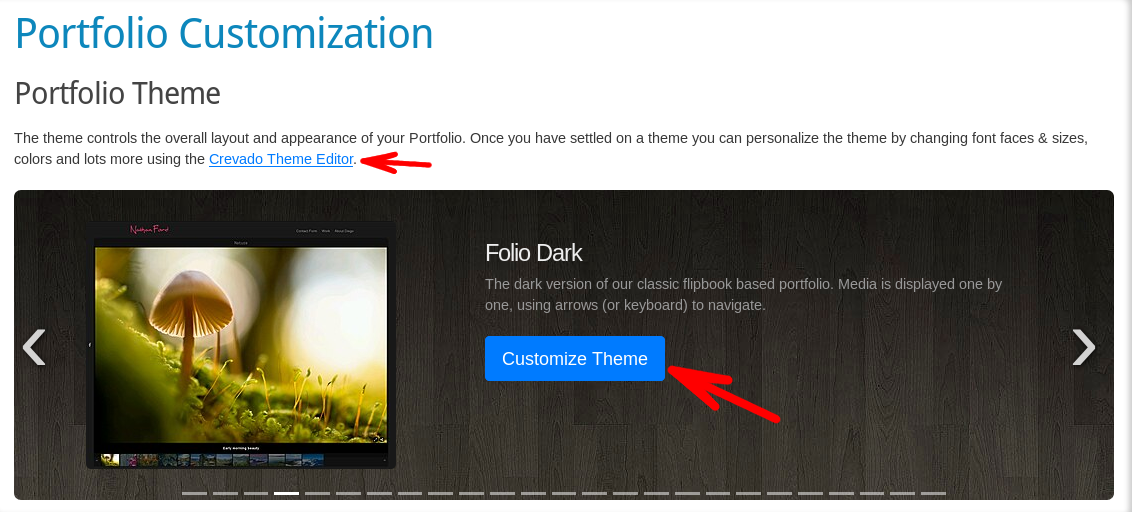
Then launch the Crevado Theme Editor by clicking the Customize Theme button or link, as shown below:

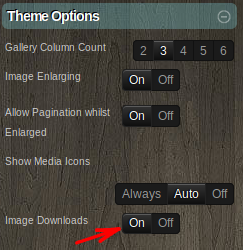
Once the Crevado Theme Editor has launched, click on Theme Options on the left hand side and change the image downloads option to ON.

Next save the change by clicking the green Apply Changes button at the top left of the page:

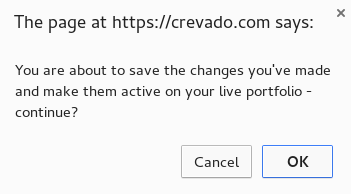
Confirm the saving of the changes by clicking OK on the confirmation pop-up:

While the Crevado Theme Editor (Theme Options) controls the downloading of images from your Galleries by default, that can now be overridden on a per Gallery basis.

The Crevado Theme Editor allows you to turn ON or OFF image downloading globally, across all of your Galleries.

The Gallery Option allows you to control the downloading of images on a per Gallery basis.

What you choose, depends on your needs e.g. if all Galleries allowing image downloads is what works for you then you would turn it ON using the Theme Editor and then use the Gallery Option just to turn off image downloads on one or two of your Galleries. Alternatively if you want only a few of your Galleries to be downloadable, you would turn it OFF in the Theme Editor and then use the Gallery Option to turn it on for a select few Galleries.

Here we will explain how to use the Gallery Option to control gallery image downloads.

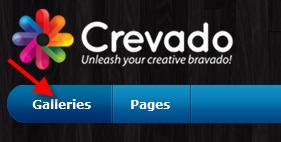
Firstly, from Crevado Admin, click Galleries:

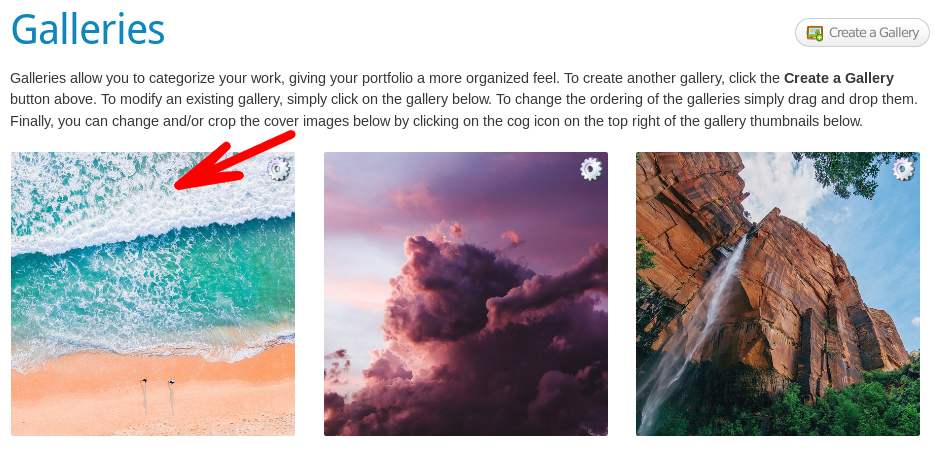
Locate the Gallery that you wish to edit the download option, click on the Gallery to select it. For this example we are using our The Sea Gallery:

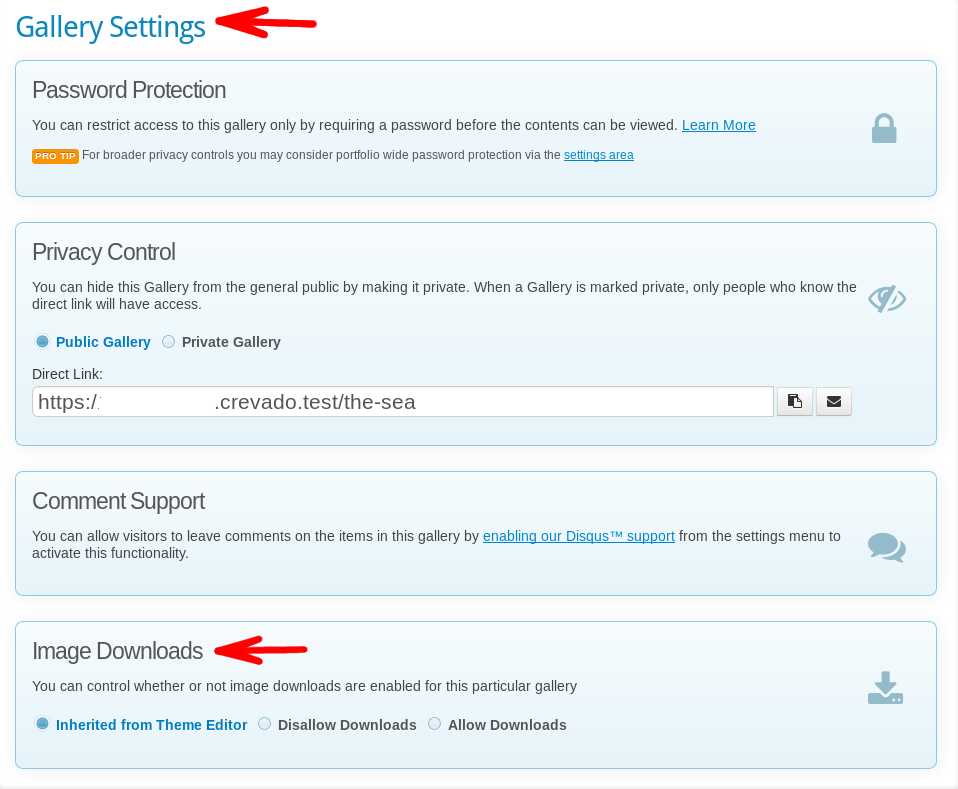
Once in the Gallery, scroll down to the blue Gallery Settings heading and the last option here will be Image Downloads:

Simply select the option you want by clicking on it:

  • Inherited from Theme Editor
  • Disallow Downloads
  • Allow Downloads

A yellow pop-up at the top of the screen will confirm your selection and you are done!

Something not working? no worries - just contact us!

Integrating a Blog With Your Crevado Online Portfolio

When building your Crevado Online Portfolio website, you can use blogging as an effective way to market your portfolio, increase visitor engagement and boost the number of returning visitors to your website.

If you run a Blog on a website such as Blogger, LiveJournal, Wordpress, Tumblr or the countless other blogging services, then you may be wondering if it's possible to incorporate your blog into your Crevado Online Portfolio website? The answer is YES it is and it's really easy! Here's how to do it:

From Crevado Admin, click Pages:

From the Page Management page, click the Create Page button on the right of the screen:

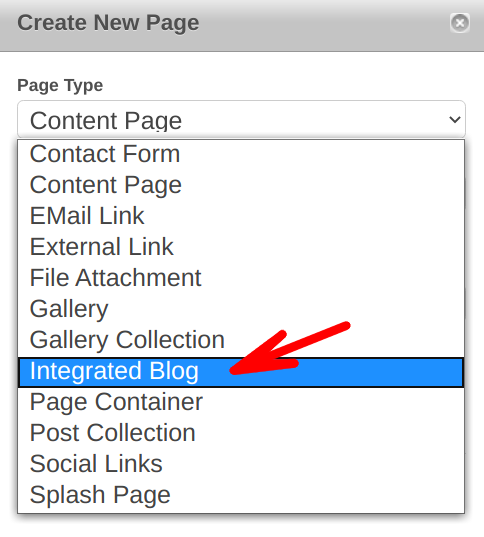
The Create New Page pop-up will appear and from there change the Page Type to Integrated Blog:

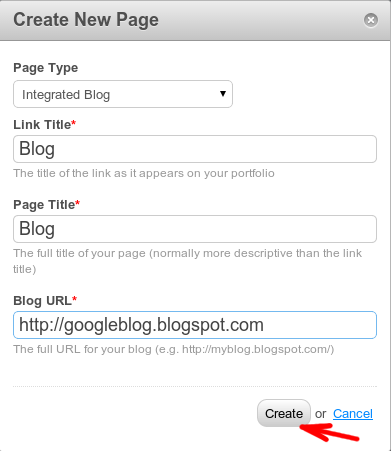
Next, specify the Link Title of your blog, this will appear on your Crevado Portfolio and when clicked on will take visitors to your Blog. 'Blog' is always an obvious choice but it's entirely up to you what you call it (keep in mind you can always change the link title by editing the properties of the page after it's created). Next enter the Page Title and finally enter the full address of your blog, for example http://googleblog.blogspot.com. When you're done click the Create button and the details will be validated and your page will be saved:

Now click the View Your Portfolio link on the top right of Crevado Admin:

From there you will be able to see that your Blog is now integrated with your Crevado Portfolio:

Your blog page is dynamic and will be updated automatically so when you add (or update) articles from your blogging app they will automatically refresh on Crevado - all you need to do is wait a little while!

Got questions on our blog integration? Something not working? no worries - just contact us!

Customizing the Favicon on Your Crevado Online Portfolio

A favicon is the name for the icon which you probably normally associate with the websites’ you’ve bookmarked or “favourited” in your browser. The image below indicates one of the places the icon is used (in this case, within Google Chrome but the same is true for Firefox, Internet Explorer, Safari and more). The default favicon on your Crevado Online Portfolio is the Crevado logo:

However, fear not, you can change your favicon using the Crevado Theme Editor:

To access the Crevado Theme Editor, from Crevado Admin, click on the Customize button:

Then click on the blue Customize Theme button or link, as shown below:

This will launch the Crevado Theme Editor.

Once the Crevado Theme Editor has loaded, click on the Header & Logos option from the left side menu and then change the favicon by clicking the Upload button next to the favicon option and select the favicon file you wish to use then click Open/Upload:

NOTE: Your favicon image format and dimensions are important! Please read the following Wikipedia article regarding favicon format and sizes versus browser compatibility!

Once you’ve uploaded your favicon a preview will appear next to the upload button. From now on, visitors who browse your Crevado Online Portfoio Website will see your personalized favicon rather than the default Crevado icon:

Hell yeah! Let the good times roll!

How Do I Edit the Gallery Thumbnails on My Portfolio?

The thumbnails for your Galleries can be managed from the Galleries area of Crevado admin:

How do I change the order of the thumbnails?

You can reorder your Gallery thumbnails simply by dragging and dropping the thumbnail into the desired position.

Changing the Thumbnail Image

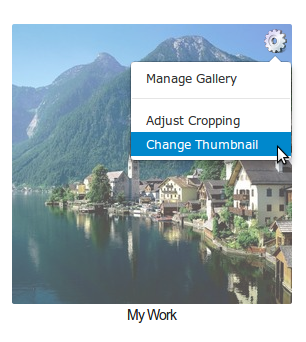
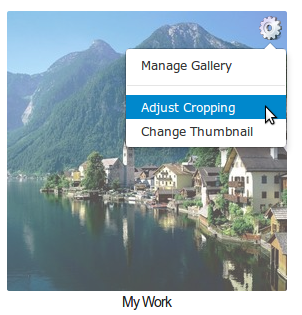
Changing the thumbnail image is easy. Hover your mouse over the Gallery thumbnail you want to change and click the cog icon which appears on the top right of the thumbnail. To change a thumbnail to an alternative image, click Change Thumbnail:

You can then choose to either upload a new image or select an existing image from the Gallery which can be used to represent it. It’s wise to customize the layout of your galleries first and then crop accordingly once you’ve settled on the desired layout.

Did you know? Transparent PNG images as well as Animated GIF images may be used as gallery thumbnail images

Cropping an Existing Thumbnail

The default cropping applied to your Gallery thumbnail may not suit every type of image, in these cases you may wish to manually adjust the cropping for maximum impact.

Hover your mouse over the Gallery thumbnail you want to change and click the cog icon which appears on the top right of the thumbnail. From the dropdown menu click Adjust Cropping :

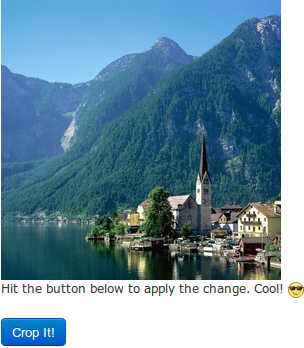
From the cropping page, you’ll see a yellow box which represents the target cropping area

You can resize the crop area by dragging and dropping the resize squares located at the edges of the yellow crop area. To move the crop area itself simply drag and drop it.

Note: Underneath the cropping area you’ll see a preview image which shows you how the cropped image will look should you save the changes.

To save your changes click Crop It!

Your Gallery thumbnail has now been updated to use the cropped version of the image.

Also see

HOWTO: Sell Photo Prints and More Using Your Crevado Online Portfolio

NOTE: Fotomoto support requires a Premium Account for details see the plan comparison page

So, how does it work?

Crevado has built in support for Fotomoto which enables you to sell your photographic works directly from your Crevado online portfolio website. Supported formats include photo prints, canvas and more! To enable Fotomoto integration simply visit our Fotomoto Setup Page and click the Sign Me Up! button. Note that this is a one click process and once you’ve been setup you will receive an activation email from Fotomoto.

TIP: If you don’t receive the email then remember to check your junk/spam folder as the email may be hiding there!

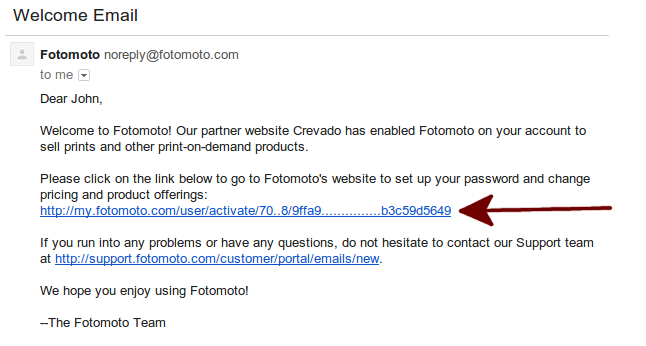
Please follow the instructions in the email and activate the Crevado/Fotomoto integration by clicking the activation link as indicated below:

img

TIP: It's important that you fully activate your Fotomoto account otherwise the integration will not work as expected.

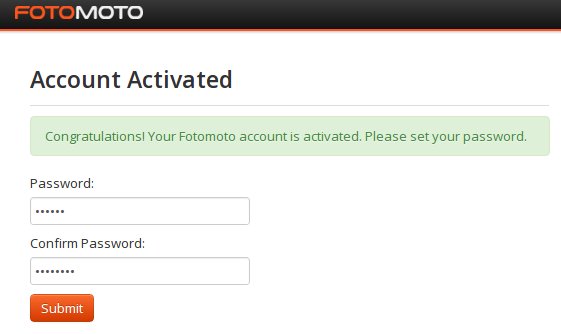
Activating simply involves choosing a password for your Fotomoto account:

img

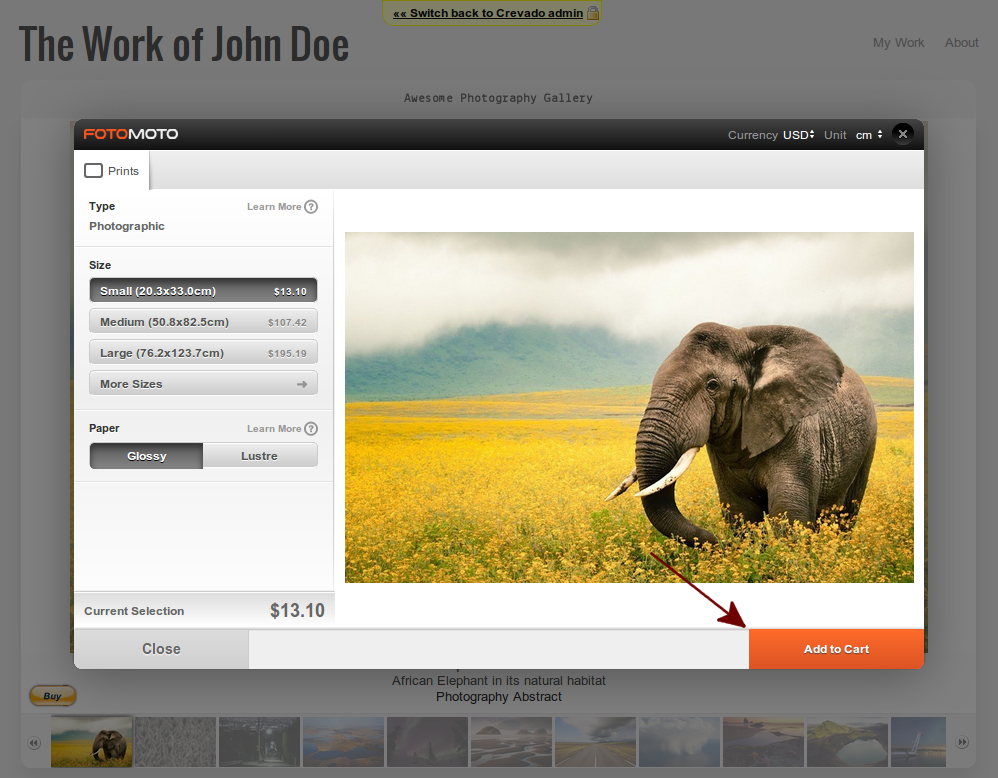
That’s it! Crevado is now linked to your newly created Fotomoto account and you can sell photographic prints directly from your online portfolio! Any images marked available for purchase in Crevado will display a buy button which when clicked will popup the Fotomoto cart widget and allow the visitor to purchase the image as a print.

NOTE: High Resolution Images are automatically sent to Fotomoto - there is no need to configure the Auto Pickup mechanism.

img

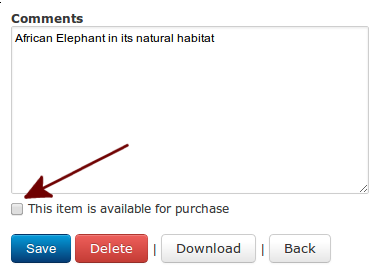
From within Crevado Admin images can have their purchase ability switched on or off, on a per image basis, by simply editing the image details (by default everything is marked available for purchase):

img

Don’t Forget to Configure Fotomoto!

From the Fotomoto control panel click Select Products and Prices and configure the available formats for your work and set pricing for each type.

To configure formats, click the on/off switch for each individual type you wish to offer for purchase:

img

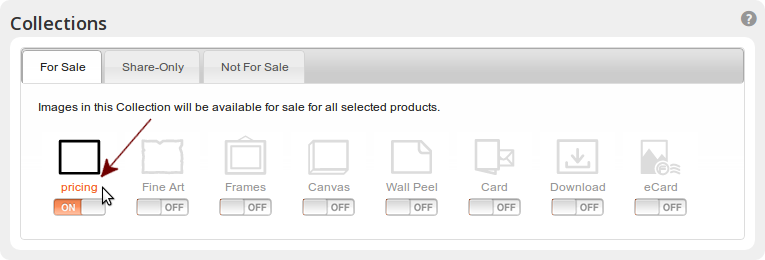
Pricing for a particular format may be configured by clicking the pricing link which appears when you mouse over the format type title:

img

Also check out the Fotomoto Tour Page. For further help and support on Fotomoto please visit the Fotomoto Support Page.

HOWTO: Setup Disqus Comments System Your Online Portfolio

How Do I Enable Disqus Integration so people can leave comments on my Work?

It’s pretty easy! Crevado has built in support for Disqus, a popular and comprehensive commenting system for modern websites.

Got Your Disqus Account Details?

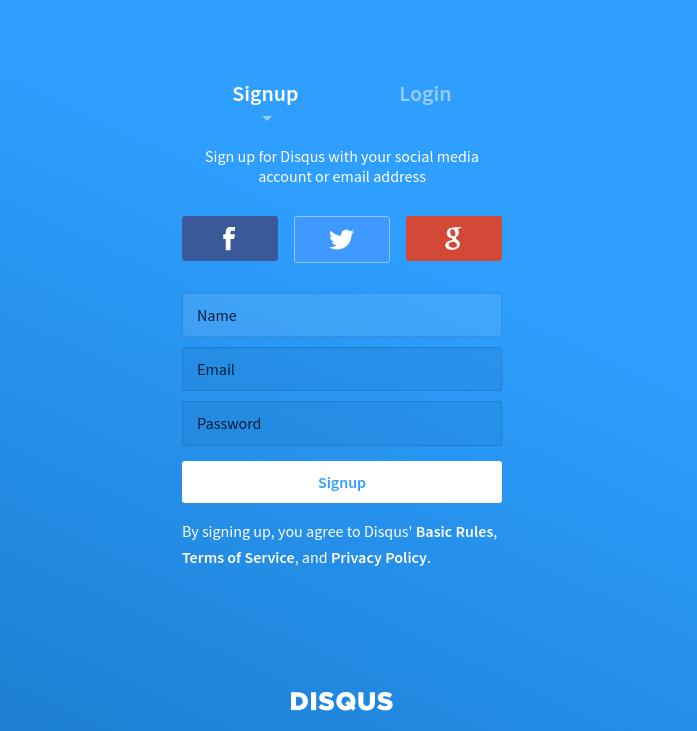
Before you can enable Disqus integration you need to have a Disqus account. If you don’t have a Disqus account go here and sign up by clicking on one of the Get Started buttons. Once you do, you will need to enter a Name, an email address and create a Password. Then click on the white Signup button:
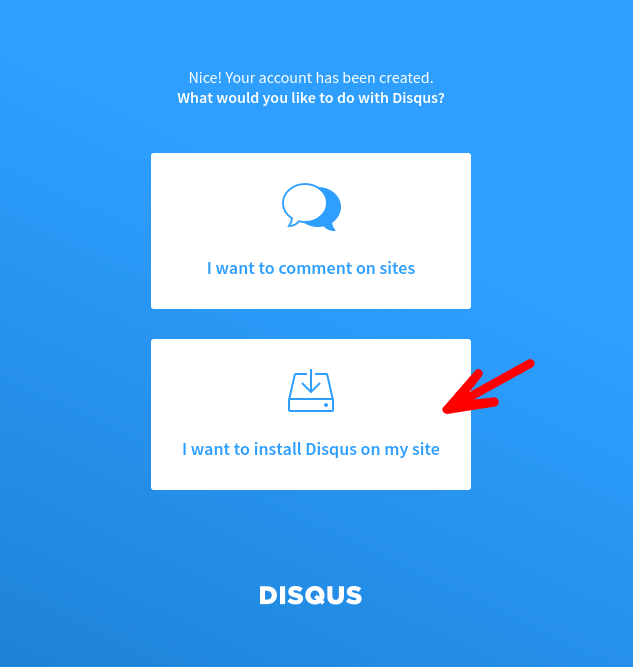
Next you need to click on the "I want to install Disqus on my site" button as shown below:
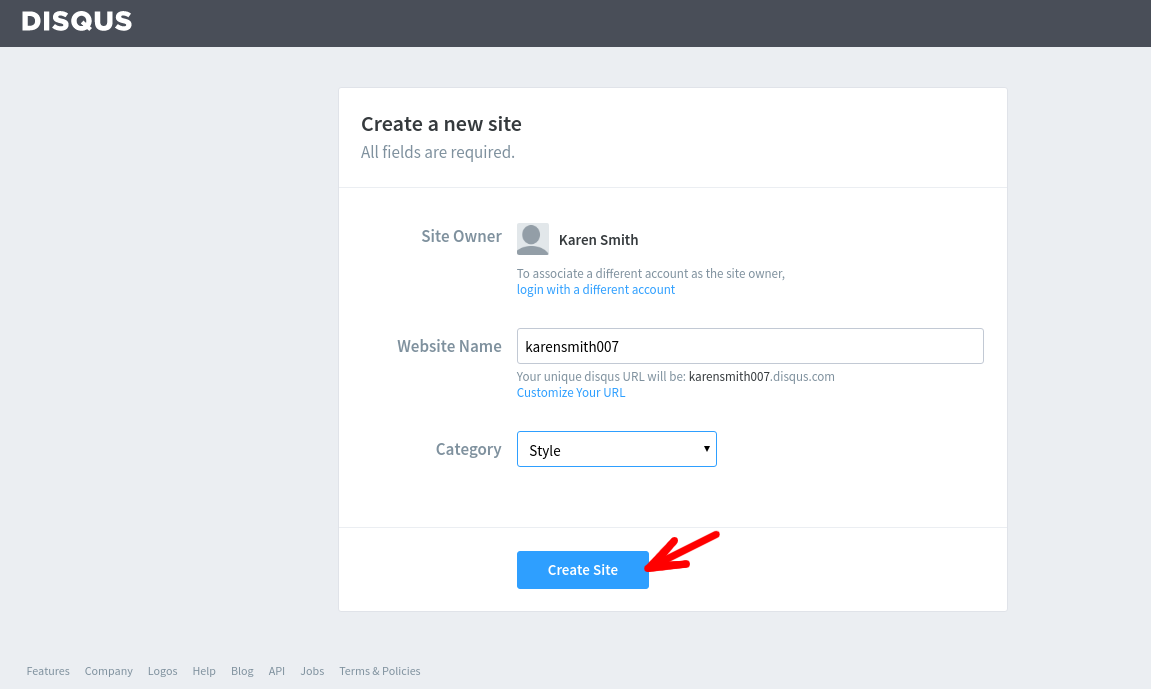
This will bring you a new page where you must choose your Disqus Website Name and select a Category for your profile and then click the on the blue Create Site button:

NOTE: Please take note of your Website Name as you will need this later to finish the set up process!
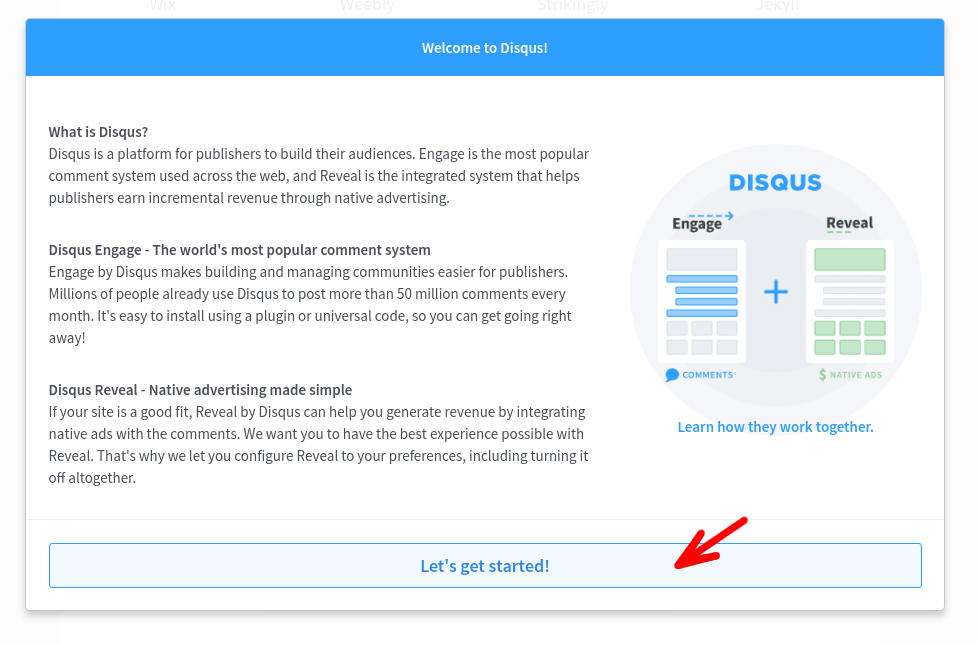
The next page you will see is an Disqus information page and you need to click on the Let's get started! button as shown below:
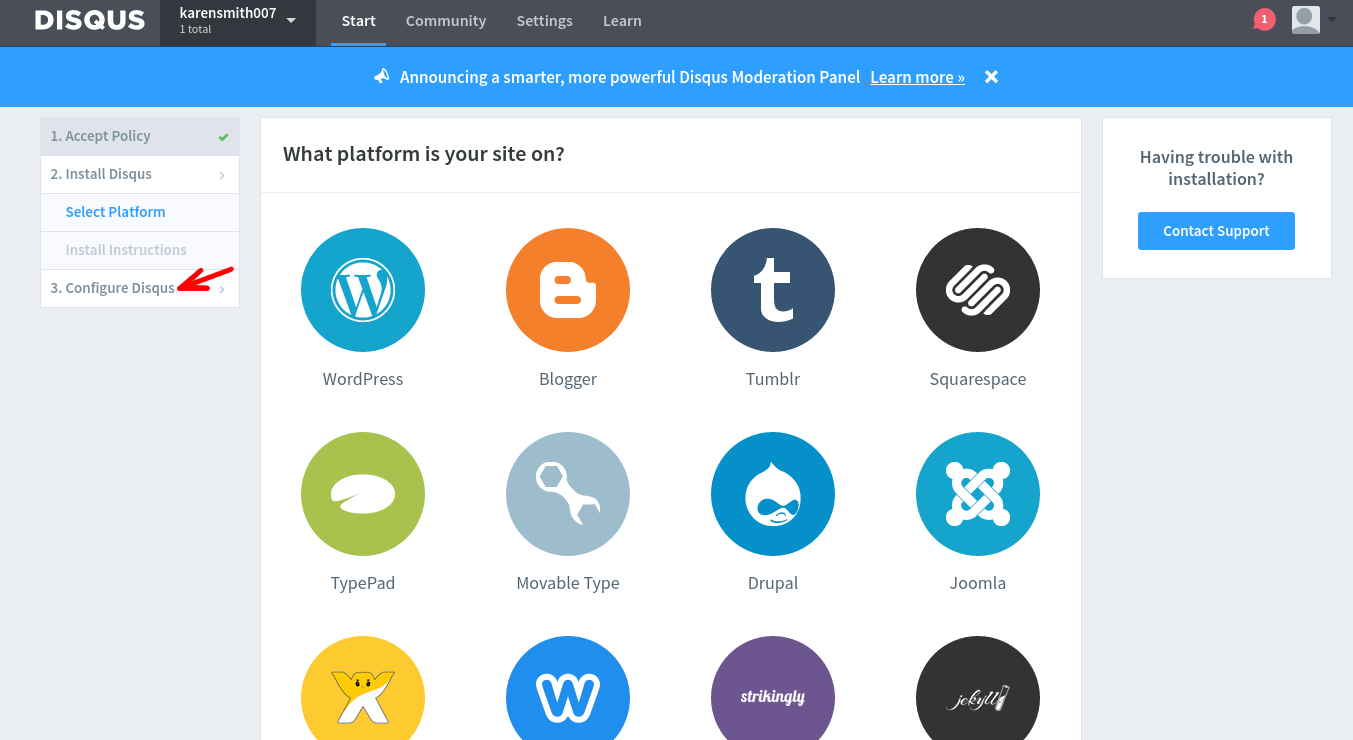
The next page you will see is about Platforms, once here simply click on option 3 - Configure Disqus on the left of the screen as shown below:
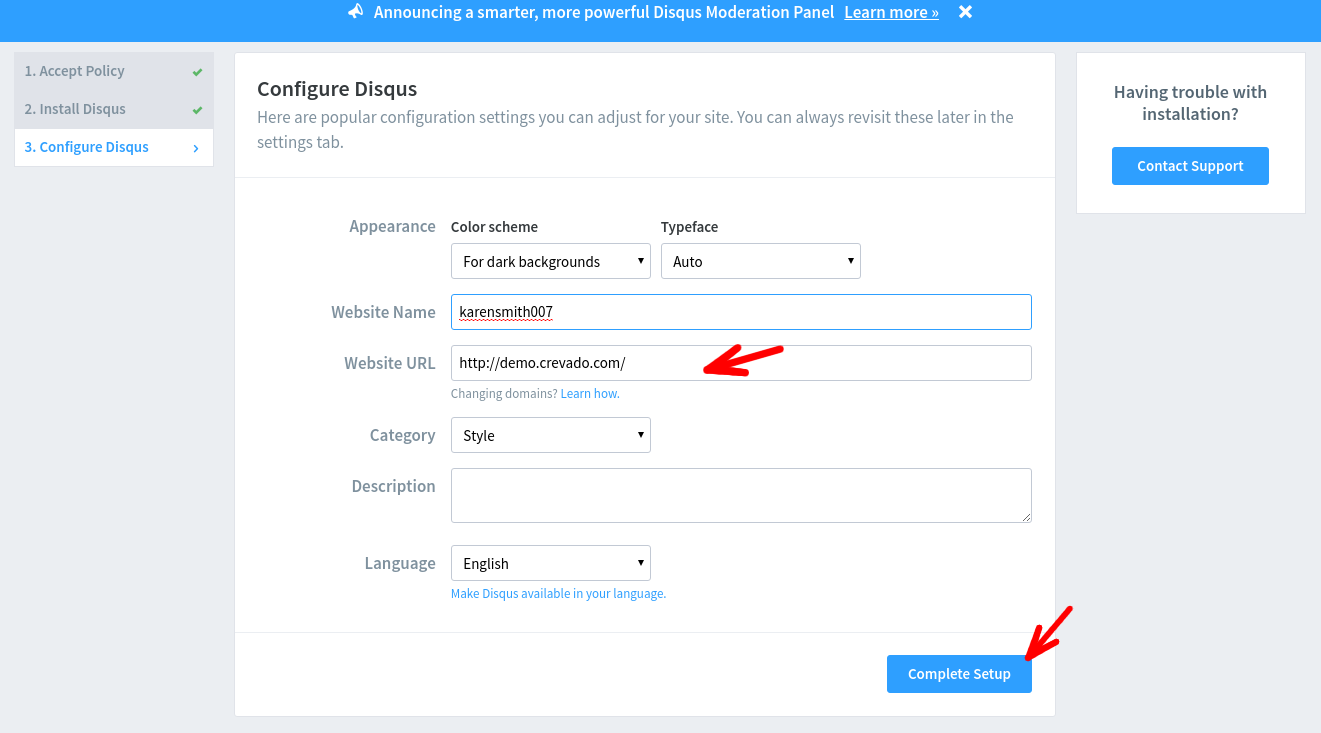
Now you are on the Configure Disqus page. Firstly, you need to select the Color Scheme that will suit your Portfolio best. This should be selected based on the Theme that you use for your Crevado Online Portfolio. You can see the options, "For Light Backgrounds" or "For Dark Backgrounds" by clicking on the arrow under the Color Scheme heading and a drop down menu will appear:
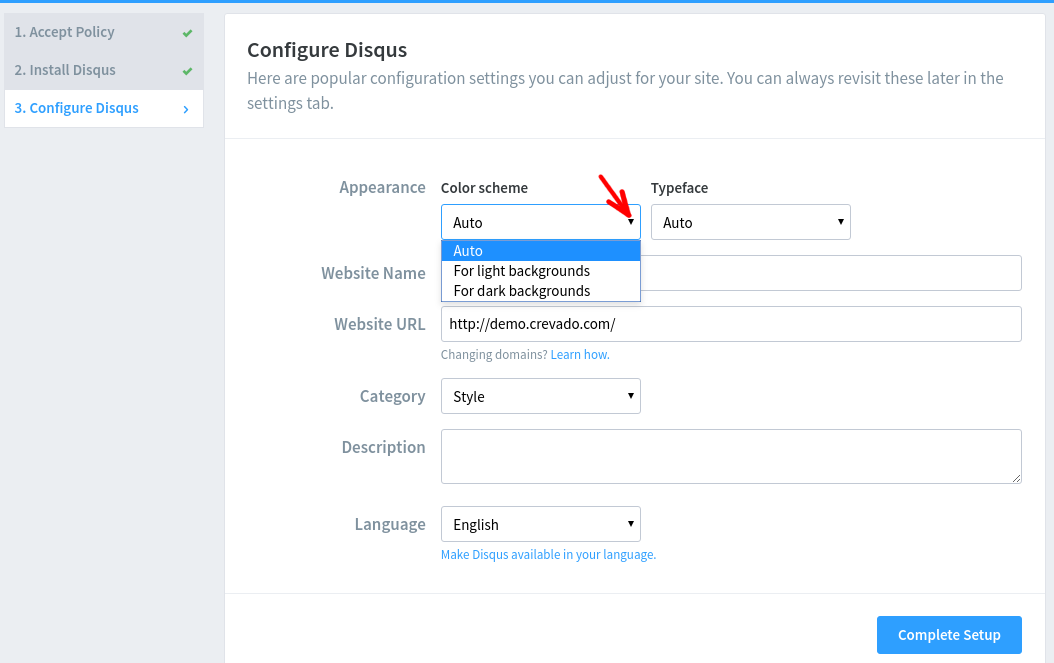
Next you need to enter your Crevado Portfolio URL in the Website URL field, e.g. if your Crevado domain is ‘demo’ then your URL would be http://demo.crevado.com/. If you are using a custom domain name then you'll need to use the full address of your custom domain for example, http://www.your-online-portfolio.com. Once you have done these steps then click on the blue Complete Setup button.

NOTE: When entering your Portfolio Website URL, avoid prefixing your domain with www. unless it’s part of your Crevado Domain name!
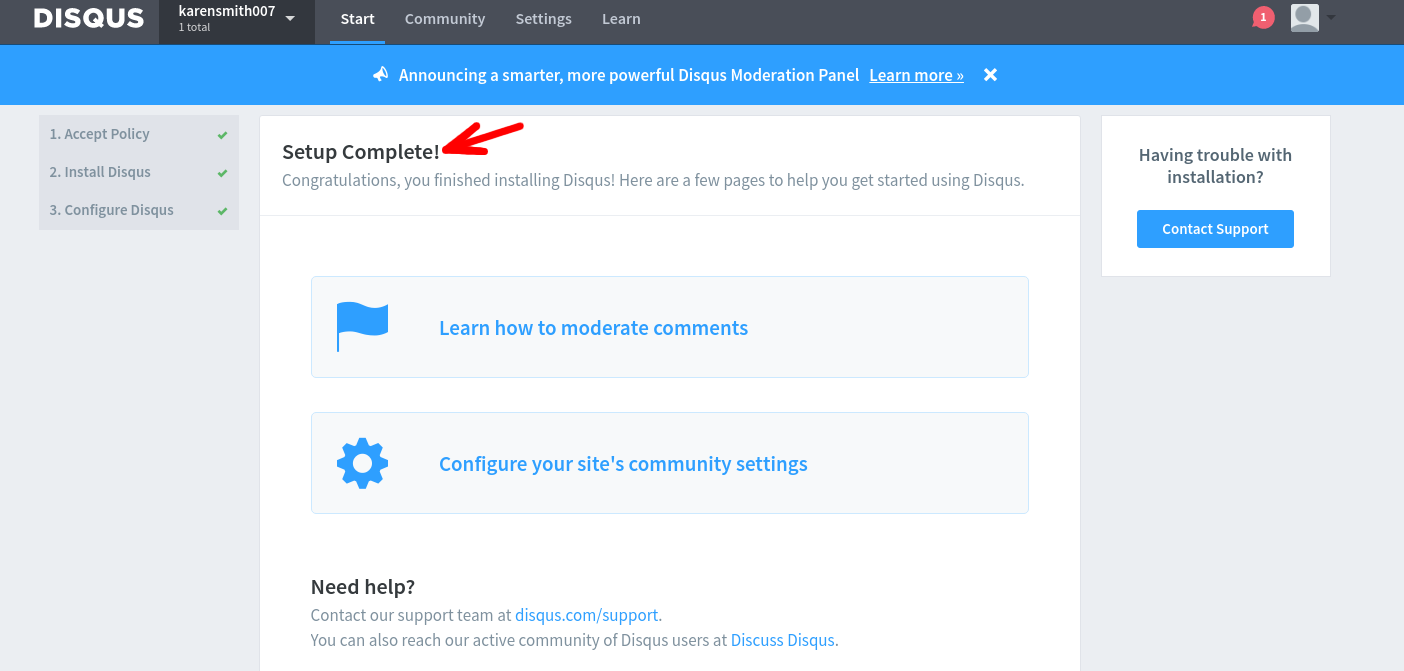
That's it, you are finished with Disqus and this is the page you will see displayed Setup Complete!:
What's next? Well now that you’ve got your Disqus account setup, we need to tie it to your portfolio. So switch back to Crevado Admin and enter your Discus Website Name to tie it to your portfolio - keep reading to find out more!

Enabling Disqus Comments with your Crevado Portfolio:

From Crevado Admin click Settings:

img

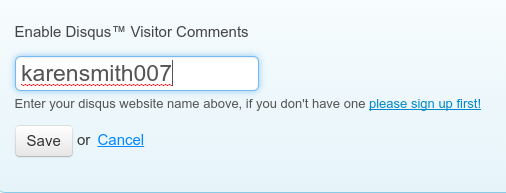
Scroll to the Disqus feature box and enter your Disqus Website Name to activate the integration (if you don’t know what a Disqus Website Name is see the top section of this article).

img

Once you’ve entered your Disqus Website Name just click Save and Disqus Integration will be activated:
img

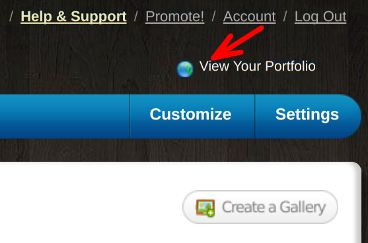
You should verify that the comments system is working by clicking the View Your Portfolio link:
When viewing a Gallery you’ll see the comment system load underneath the main stage.

Can the Comments System be Disabled for certain items?

The comments system can be enabled/disabled on a per Gallery basis. To change whether the comment system is enabled for a particular Gallery simply select the Gallery from the main Galleries section. Then scroll down through the Gallery Configuration until you find the Comment setting box.

img

Here you can enable/disable the comments system for the Gallery in question.

Enabling Disqus Comments on a Content Page:

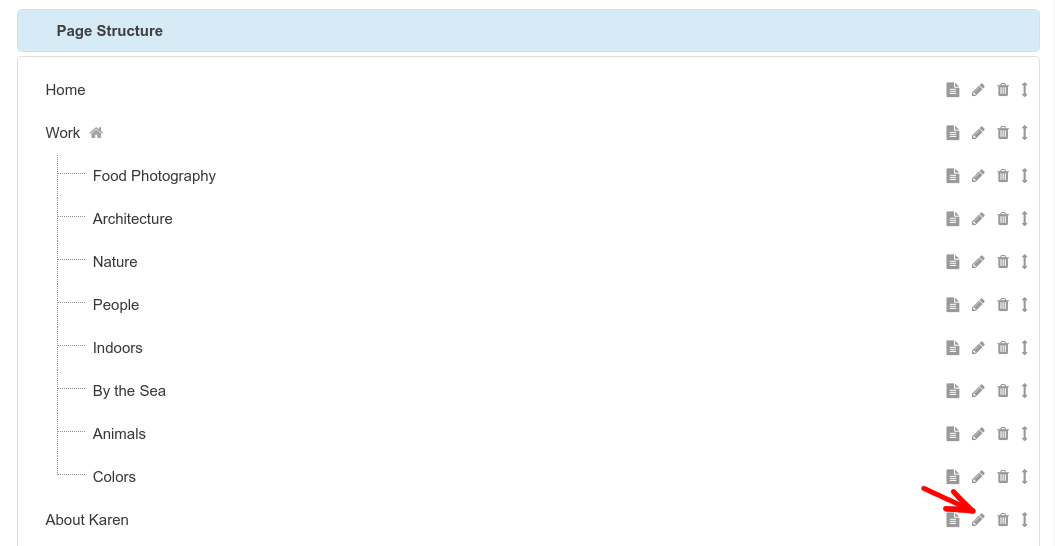
Once Disqus support has been enabled you can optionally enable commenting on select content pages too. If you wish to do this, from Crevado Admin click Pages:

From Pages locate your About Page and click the related Page Properties (pencil) icon:
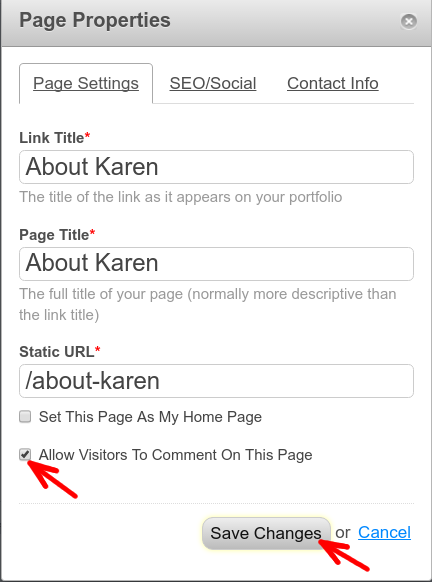
A pop-up will open and you simply tick the box next to "Allow visitors To Comment on This Page" to enable comments and then click on Save Changes:
Now, at the bottom of your About Page on your Crevado Online Portfolio website you will see the Disqus comments area, depending on the Theme you are using it will look something like this:

Why Doesn't My Portfolio Appear in Google and Other Search Engines?

What is a Search Engine anyway ?

Search engines allow people to search across the billions of web pages available on the internet of today for topics or keywords of their choice. Without Search Engines, discovering or finding websites of interest to you would be very difficult.

There’s lots and lots of Search Engines out there but realisticly speaking you really just want to target the big three: Google (67% market share), Microsoft Bing (16%) and the Yahoo! Network (13%).

Yahoo and Microsoft teamed up a couple of years ago providing a bigger threat to Google’s dominance. Under the companies’ 10-year agreement, Microsoft handles Internet queries for Yahoo pages. Microsoft also has rolled out a multimedia advertising campaign to attract users and is bolstering results by displaying data from Facebook Inc.

How do I get my Portfolio to appear in Search Engines, such as Google?

Search Engines index the internet primarily by sending out robots (known as Spiders) which discover sites by following links from sites they already know about. This process is called Spidering and it’s how Spiders build up an map of the world wide web (internet).

Armed with this knowledge, your first course of action should be to get the link to your portfolio “out there” as much as possible. Example recommended practices include:

  • If you use message boards or forums, add your website to your user profile and/or signature.
  • If you use social media networks, such as Facebook, Twitter, Instagram etc. then you should share your portfolio with your friends. Crevado provides you with an easy way to do this - simply click the Promote link from within Crevado admin and share your portfolio on whatever networks you’re a member of.
  • This applies to your day to day communication too! Add your portfolio address to any stationary you have, put it on your outgoing email signature etc.

Manually Submitting your Crevado Online Portfolio to Search Engines

The fastest ways for spiders to get to know about your portfolio is for you to tell them. Google and Bing both have pages where you can submit your site for inclusion. We recommend adding your portfolio URL to both Google and Bing once you’ve populated it with content:

Spiders have a lot of work on their hands (do spiders have hands?)! Be patient - it can take anywhere from 1-4 weeks after submission to appear in search results.

How to Temporarily Suspend Your Crevado Account

NOTE: Only paid accounts can be suspended - it's not possible to suspend free accounts.

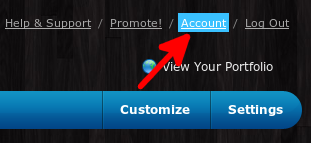
To suspend your account you first need to visit your Account page by clicking the Account link on the top right hand corner of Crevado Admin:

Once you are on the Account page, scroll to the bottom of the page and click on the blue Account Cancellation link:

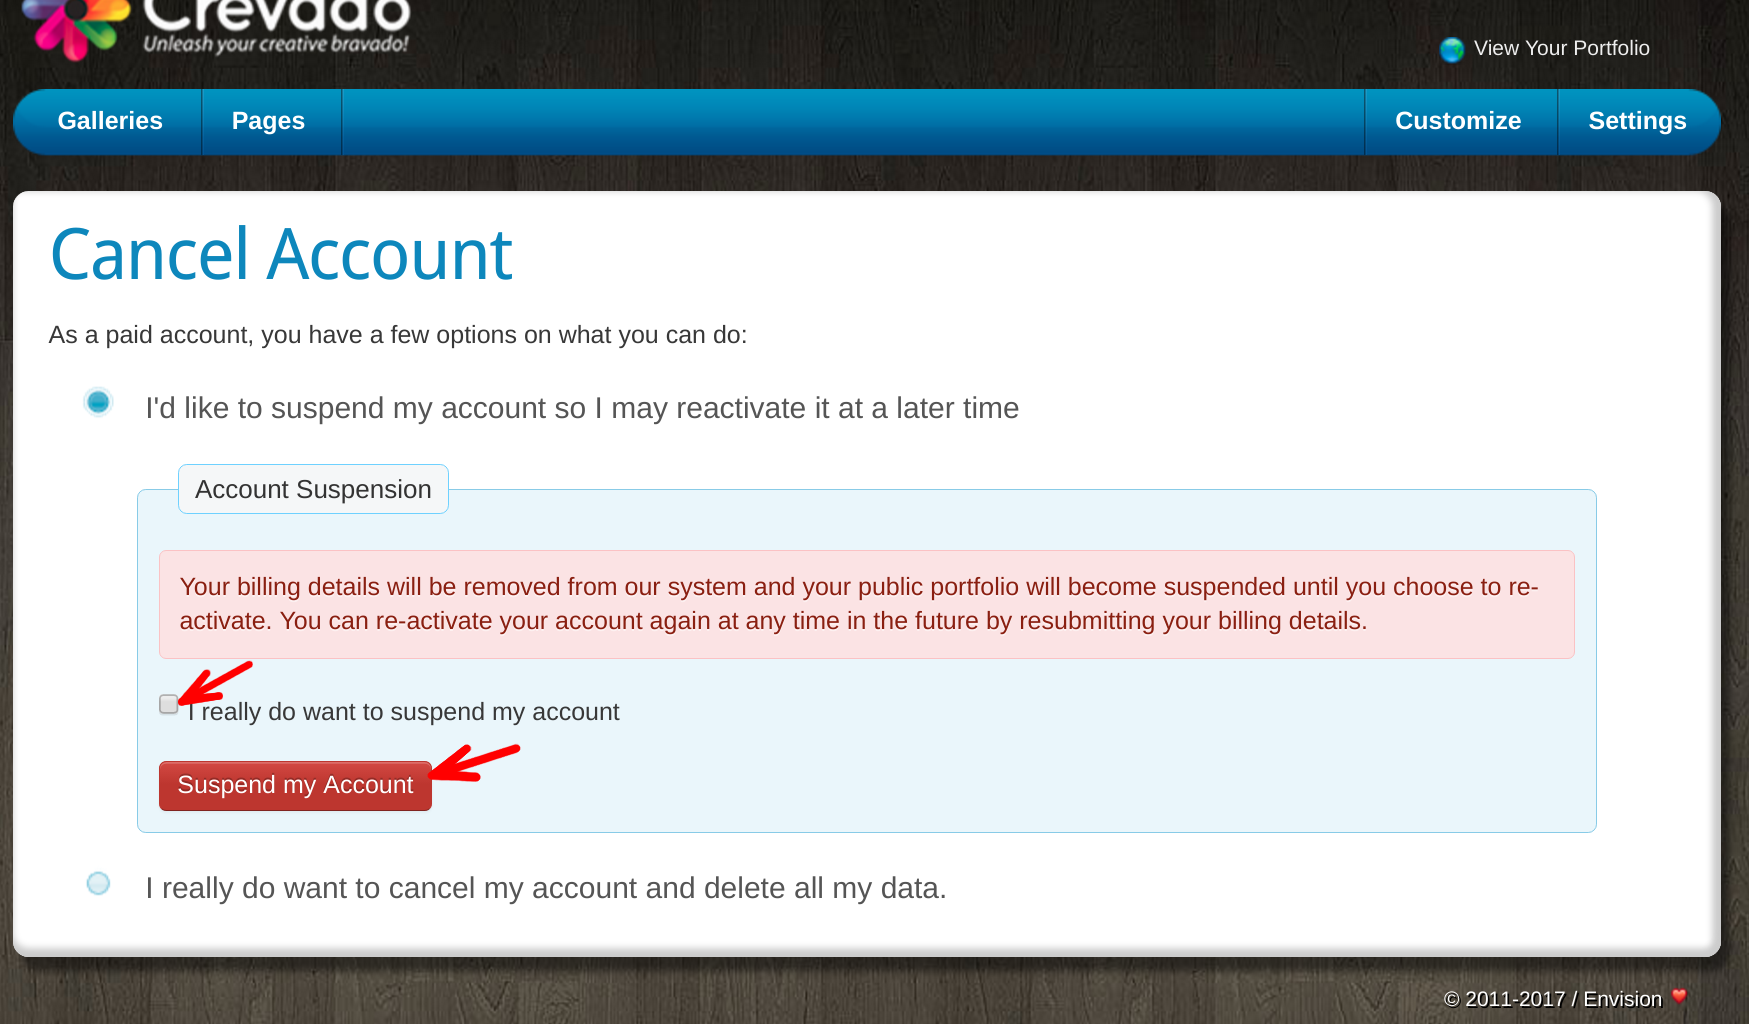
You will then be given two options, the first option is the suspend option and reads I'd like to suspend my account so I may reactivate it at a later time. Click on it to select it, as shown below:

Then tick the box and click on the red Suspend My Account button to confirm your decision:

You will receive an email to the email address that you have registered with Crevado, confirming that your account has been suspended.

How to Permanently Delete Your Crevado Account

Feel the need to jump ship? No problem, it's easy to permanently cancel your Crevado account. See the instructions below on how to accomplish this.

WARNING: DELETING YOUR ACCOUNT WILL DELETE ALL YOUR ACCOUNT CONTENT INCLUDING ANY IMAGES, VIDEOS, AND PAGE CONTENT - THIS OPERATION CANNOT BE UNDONE!

To delete your account you first need to visit your Account page by clicking the Account link on the top right hand corner of Crevado Admin:

Once you are on the Account page, scroll to the bottom of the page and click on the blue Account Cancellation link:

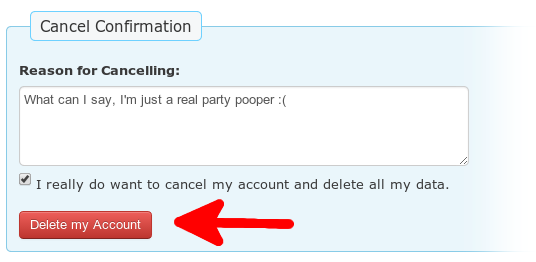
OK, this is the final step so at this point we recommend listening to the following tune to set the scene .. If there's a particular reason why you're cancelling your account please let us know in the cancellation reason box provided. When you're ready to delete your account tick the checkbox labelled 'I really do want to cancel my account and delete all my data' and then press the red 'Delete my account' button

NOTE: We cannot un-delete accounts - once you delete your account you will need to start over should you wish to reinstate your account in the future.

Once you press the 'Delete my account' button the following will happen:

  • You will be signed out and will receive confirmation that your account will now be deleted.
  • If you are a paid account your payment details will be immediately removed from our system and any billing related to your account will cease immediately.
  • Your account and all related content will be deleted over the course of the next few minutes.
  • You will probably cry, uncontrollably - fear not thou, you can return at any time!

Suspending Your Account (PAID ACCOUNTS ONLY!)

Instead of deleting your account, paid account holders have an additional option of temporarily suspending their account. You can unsuspend at any time by re-submitting your payment details and pick up right where you left off.

To suspend your account you first need to visit your Account page by clicking the Account link on the top right hand corner of Crevado Admin:

Once you are on the Account page, scroll to the bottom of the page and click on the blue Account Cancellation link:

You will then be given two options, the first option is the suspend option and reads I'd like to suspend my account so I may reactivate it at a later time. Click on it to select it, as shown below:

Then tick the box and click on the red Suspend My Account button to confirm your decision:

You will receive an email to your registered Crevado email address confirming that your account has been suspended.

Something not working? no worries - just contact us!